01 - Introduction to LaTeX, equations
01 - Introduction to LaTeX
What’s LaTeX?
LaTeX is a document creation system that uses a set of markup tags to specify content, structure, and formatting of the document - similarly to how HTML is used for creating websites. In comparison to WYSIWYG (What You See Is What You Get) editors, this creates unified look of documents and enforces organized structure. Thanks to that, it is possible to automatically generate various tables of contents and references to various parts of the documents. As long as you use build-in styles or templates (for example, provided by a book publisher) minimal effort is required to create a document that looks professional.
Additional info and tutorials on LaTeX can be found below:
https://www.overleaf.com/learn/latex/Main_Page
https://ctan.org/pkg/lshort-english
https://en.wikibooks.org/wiki/LaTeX
Getting started
Documents in LaTeX are written in a source file (with
tex extension), which is then compiled to
a selected output file format, such as PDF. Shorter documents can be
written in a single tex file, more complicated works can
consist of many tex files.
❗️Assignment❗️
In this tutorial, all assignments will be highlighted with symbols as above. ***
Document structure
Modern editors usually provide a wizard which generates an empty document template using specified properties, without the need to type them manually. In TeXstudio, select Wizards → Quick Start…:
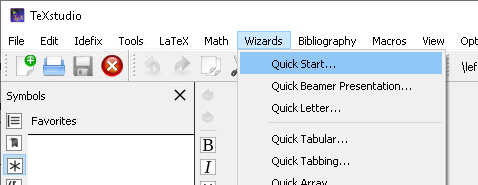
After the wizard launches, a following window is shown:
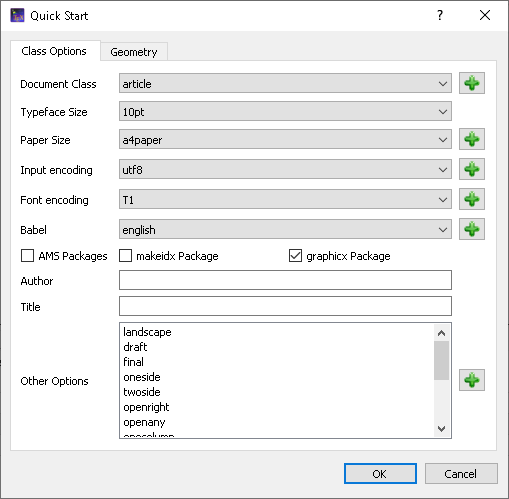
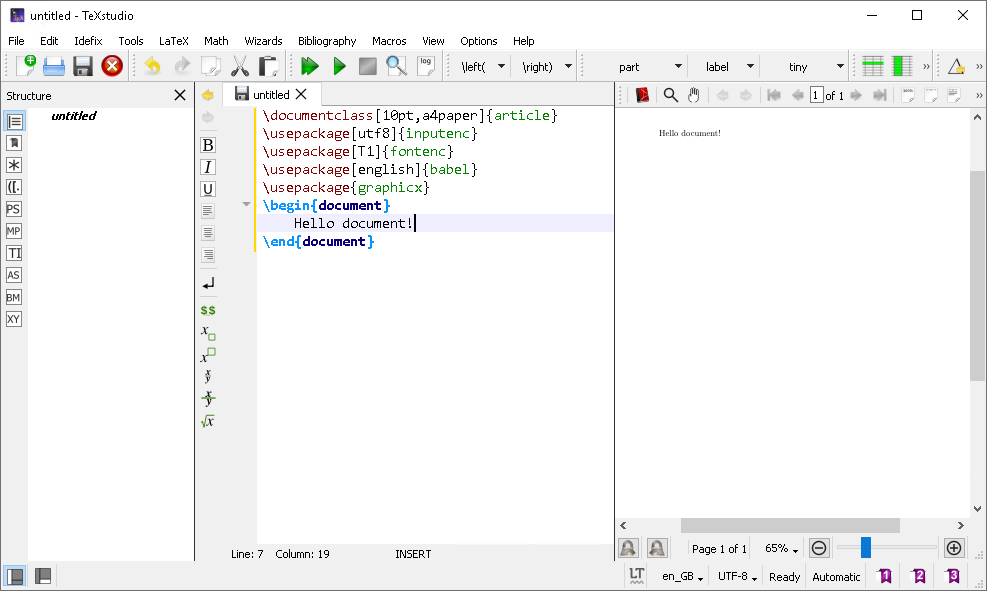
Our first document will be an article written in English. Fill all the options as specified above and accept. The editor should look like this:
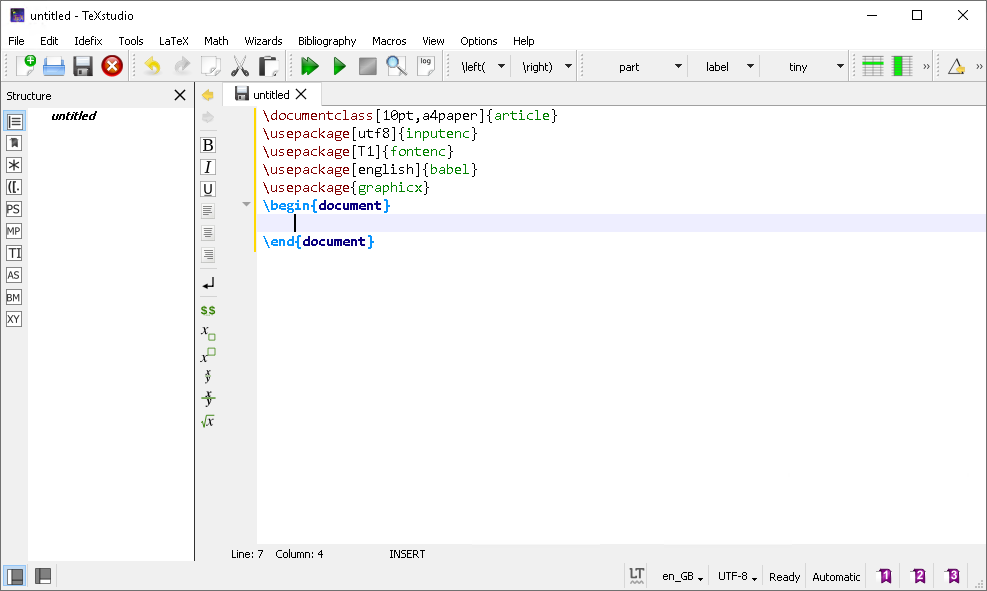
The central part of the editor contains currently opened source file. Side panel on the left contains various panes showing document structure and helpful tools.
LaTeX source files consist of a preamble and document body. The
preamble begins at \documentclass. It specifies the type of
document we are composing and various settings related to it. Packages,
which provide additional functionality are also loaded here. For example
\usepackage[utf8]{inputenc} specifies that source file
encoding is assumed to be UTF-8, which is recommended to avoid problems
with various “special” characters.
\usepackage[english]{babel} provides extra rules used in
English language, such as automatic word hyphenation. Sometimes the
packages conflict with each other, causing a compilation error,
e.g. because they provide commands of the same name, other times it’s
important to include packages in a correct order. These problems should
not appear during these classes. When including new packages, it’s
safest to do it one by one.
Document body begins at \begin{document} and ends at
\end{document}, and contains all the content that will be
compiled into output file (empty at the moment).
All commands in LaTeX begin with a backslash
(\). Mandatory arguments to commands are enclosed in curly
brackets ({ and }), optional parameters are
provided in square brackets ([ and ]). The
editor provides auto-complete functionality and displays a brief help
with many commands.
❗️Assignment❗️
Launch the Build & View command using double green arrow button:
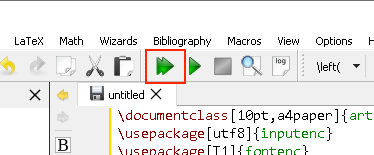
A preview should appear on the right hand side of the editor. Is the document visible? Try adding some text in the document body. Compile the document again. You should see the document now, as below:
 ***
***
Basic document structure
Elements describing metadata of the document should not be formatted directly, but using proper commands. Let’s define the document’s title and author using below commands:
\title{My first document}
\author{John Doe}
Compile the document. Did the title appear?
Above commands only specify the metadata, they do not print
it. To generate a title section, use \maketitle command, at
the beginning of the document body. Additionally, you can provide a
specific creation date using \date{} command.
Any line can be commented-out using a percent (%) sign.
All content (commands, text) in a line after a percent is ignored.
❗️Assignment❗️
Build a document with your own title and name. Then, specify your
birthday as the creation date. Then, comment-out the
\date{} command. ***
Document structure, table of contents
One of useful features of LaTeX is automated creation of tables of contents and document structure. Use the following commands to define beginning sof various section types:
\part{title},\chapter{title}(only for books and reports),\section{title},\subsection{title},\subsubsection{title},\paragraph{title},\subparagraph{title}.
A \tableofcontents command can be used to insert an
automatically generated table of contents.
❗️Assignment❗️
Create a document with two sections, each with three subsections. You can generate placeholder text on various websites, for example www.lipsum.com. Insert the table of contents after title section.
Compile the document. Does the table of contents generate properly after the first compilation? Compile the document again. ***
Environments
Environments are an important feature in LaTeX that modify how contents of the environment are interpreted. Usually they are defined as follows:
\begin{environment_name}
    content...
\end{environment_name}
It is important to always close an open environment.
itemize is a useful environment to create bulleted
lists:
\begin{itemize}
    \item One point
    \item Another
\end{itemize}
Which can be easily changed to create an enumerated list:
\begin{enumerate}
    \item One point
    \item Another
\end{enumerate}
❗️Assignment❗️
Create a bulleted list with three items. Compile. Change it to enumerated list, and check the results ***
Text formatting
It is always the best practice to leave formatting to LaTeX system
and the template used. If changing font size of the whole document is
required, this can be done in the \documentclass command
parameters in the preamble.
However, sometimes it’s necessary to highlight a piece of text, and following commands can be used to achieve this:
\emph{some text}- highlights enclosed text, depending on the document’s style,\textbf{some text}- bold font,\textit{some text}- italic (cursive) font,\underline{some text}- underlines the text.
Mathematical expressions
LaTeX is perhaps the most famous for its comprehensive mathematical
expression typesetting system. The mathematical expression subsystem is
sometimes even embedded in WYSIWYG software due to its versatility.
Formulas are writren in equation environment, which can be
specified in three ways:
$\sin x$- single dollar signs place the formula inline:
$$\sin x$$- double dollar signs place the formula in a separate paragraph:

\begin{equation} \sin x \end{equation}- fullequationenvironment places the formula in a separate paragraph and assings it a number:

Additionally, equation environments will give you an
ability to refer to a specific formula (you will learn how to during
next classes).
Warning: do not insert empty lines in math environments, this can prevent the document from compiling
In TeXstudio, a helpful toolbox with commonly used math symbols is available. By default it is locaten in the left pane, under the third icon, as shown below:

A few example formulas, using most common symbols and operators are shown below:
$x^{2b}$
$x_{2b}$
$\frac{a}{b}$
$\int i(t) dt$
$\int\limits_{-T}^{T}i(t)dt$
In LaTeX, square and round brackets can be used directly.
Curly brackets ({, }) are a part of LaTeX
syntax itself, so they need to be preceeded with a backslash
(\{ and \}). Brackets inserted directly do not
scale their height to their contents:
To have brackets automatically scale, use \left and
\right commands before opening and closing brackets,
respectively:
$\left(\frac{a}{b}\right)$The brackets can be of mixed type:
$\left(\frac{a}{b}\right]$Remember, each \left command needs a closing
\right command. If you want to skip one of the brackets,
insert a dot instead of it:
$\left\{\frac{a}{b}\right.$To recreate the second formula from the sample document, an
array environment will be necessary. It is used to lay out
elements in a two-dimensional grid (such as a matrix). It requires a
single argument which defines number of the columns and alignment of
text in each column (l - aligned to the left,
c - centered, r - aligned to the right). To
separate cells in a row use an ampersand (&), to begin
a new row use double backslash (\\). An example two-by-two
centered array can be defined as follows:
$\begin{array}{cc} a & b \\ c & d \end{array}$A helpful cheatsheet for math in LaTeX can be found here: http://tug.ctan.org/info/undergradmath/undergradmath.pdf
❗️Assignment❗️
Recreate the following formulas using LaTeX:


Authors: Jakub Tomczyński, Rafał Kabaciński